Search index reindexing challenges due to Schema changes:
Reindexing is very common and quick process we always used to do in our ingestion systems, to accomodate quick search feature extension ideally reindexing do not take much time.
total inventory count now: 3116724 POST _reindex { “source”: { “index”: “source_index” }, “dest”: { “index”: “destination_index”, “op_type”: “create” } }
Use Cases for op_type During Reindexing
-
op_type: index(Default):- Use this if you want the new data from the source index to overwrite any existing documents in the destination index. It ensures that the latest version of the document is in the destination index.
- Use Case: When refreshing or restructuring an index, and you want to ensure the destination index contains the latest data, regardless of what’s already in it.
-
op_type: create:- Use this if you want to only create new documents in the destination index and skip existing documents. If the document ID already exists in the destination index, it will be skipped, avoiding accidental overwrites.
- Use Case: When migrating or merging data from multiple indices into one, and you don’t want to overwrite existing records in the target index.
. Ignoring the Conflict (Allow Overwriting)
If your application logic doesn’t need to worry about strict version control, you can simply ignore the conflict during reindexing. This can be done by adding the "conflicts": "proceed" option to the reindex request. Elasticsearch will continue reindexing without failing the whole process if a conflict occurs, but the conflicting document will not be updated.
POST _reindex { “conflicts”: “proceed”, // Ignore version conflicts “source”: { “index”: “source_index” }, “dest”: { “index”: “destination_index” } }
though there are alternative ways to reindex it using replay api, but that is more time taking
Kafka consumer lag issue due to wrong commit time
Kafka and Mongo replay issue
Added correct indexing while batch query on sorted by fields fixed by batching and added filter to update only non deleted vins
Read Replica issue for IMS Honda while syncing Model and R3 for new Vins
OEM update processing delayed due to lags on Kafka partitions while replay of all the events was already in progress
Kafka uses the concept of the append-only log which sequentially writes messages into the end of a log file. Due to the sequential write, Kafka can offer a high write throughput as it accesses the disk sequentially. However, the sequential write design makes it difficult for Kafka to provide out-of-the-box support for message prioritization. other reason is Messages in a Kafka topic can be consumed by multiple consumers at the same time. Each consumer might have different priorities which makes it impossible to sort the messages within the topic in advance.
In most message queuing systems, there is a message priority support, For example, the RabbitMQ’s priority queue ensures messages in the priority queues are delivered before the message from other non-priority queues.
Solution 1:
Keep separate topic and consumer group for replay and OEM updates. We can give the topics with higher priority more partitions as the number of partitions directly affects the number of parallelisms the consumers can afford. Additionally, the topic separation strategy allows for more fine-grained monitoring and management policies depending on the priority.
Solution 2:
Bucket Priority Pattern the Bucket Priority Pattern works by grouping partitions of a topic into several groups, also known as buckets, for different priorities. The partitions are grouped so that the higher-priority group would have more partition counts than the lower-priority group. the message key serves as the bucket indication. The BucketPriorityPartitioner inspects the message key to figure out the bucket it belongs to and then routes it accordingly.
producer configs: configs.setProperty(BucketPriorityConfig.TOPIC_CONFIG, “messages”); configs.setProperty(BucketPriorityConfig.BUCKETS_CONFIG, “high”, “medium”, “low”); configs.setProperty(BucketPriorityConfig.ALLOCATION_CONFIG, “60%”, “30%”, “10%”);
consumer configs: same as producer config configs.setProperty(BucketPriorityConfig.TOPIC_CONFIG, “messages”); configs.setProperty(BucketPriorityConfig.BUCKETS_CONFIG, “high”, “medium”, “low”); configs.setProperty(BucketPriorityConfig.ALLOCATION_CONFIG, “60%”, “30%”, “10%”);
Now, we specify the bucket the consumer will be consuming from using the BUCKET_CONFIG key: configs.setProperty(BucketPriorityConfig.BUCKET_CONFIG, “high”);
our consumer listens to the messages topic, but will only consume messages from partitions that belong to the high bucket.
NOTE: we can have message key values like high-001 and high-01901b2e-e5d3-7b5a-95da-d55947d80ce4, as long as the bucket name is the first part of the message key. For IMS it will be `high-vin
Example With dynamic partition allocation strategy in bucket priority pattern
Partition 1 : [P1: Message 1 (LP), Message 2 (LP), Message 3 (HP), Message 4 (HP), Message 5 (LP), Message 6 (HP), Message 7 (LP)]
- Two types of consumers exist:
- Low-priority consumer (processing LP messages)
- High-priority consumer (processing HP messages)
Offsets:
- Offset is a position number in a partition that tracks how far a consumer group has progressed.
- The low-priority consumer is processing LP messages.
- The high-priority consumer is reallocated to handle HP messages when they arrive.
Initial_State:
- The Low-priority consumer group starts reading from the partition P1:
- Offset 0: Message 1 (LP) – processed.
- Offset 1: Message 2 (LP) – processed. At this point, the low-priority consumer has committed the offset 2. It is now waiting to process Message 5 (LP), but no more low-priority messages are ready yet.
Arrival_of_High-priority_Messages:
- Suddenly, high-priority messages arrive in the same partition P1:
- Offset 2: Message 3 (HP)
- Offset 3: Message 4 (HP)
Consumer_Switching_to_High-priority_Messages:
- High-priority consumer starts processing:
- Offset 2: Message 3 (HP) – processed.
- Offset 3: Message 4 (HP) – processed.
- The high-priority consumer group now commits the offset 4. This means that all messages up to offset 4 have been processed.
Backlog_of_Low-priority_Messages:
- Meanwhile, the low-priority consumer remains paused at offset 2, waiting to resume processing.
- Once all high-priority messages are processed, the low-priority consumer resumes from where it left off:
- Offset 4: Message 5 (LP) – processed.
- Offset 6: Message 7 (LP) – processed.
- The low-priority consumer group commits offsets 5 and 7 after processing these messages.
`But there are draw backs of this approach Consumer Rebalancing Processing Delays for LP High Memory Usage Under utilisation of Resources Increased Network I/O Latency in Offset Commits
Solution 3:
Requester Pattern
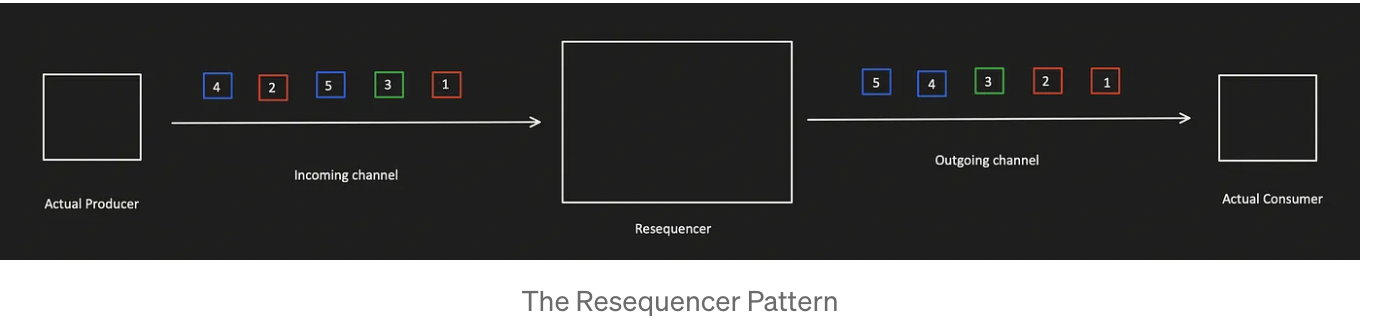
This pattern can be implemented by introducing a service in the middle between publisher and consumer. This service consumes the Kafka topic containing the messages to be prioritized. This service is responsible to handle a predefined buffer of messages. Sorting should be applied when the number of messages reaches a given capacity.
Its not a best solution available because, The resequencer was supposed to collect the messages until it reaches a condition. This condition can be met either when the buffer reaches the max capacity or when the specified time runs out. This means there could be a delay in receiving the priority messages on the actual consumer end.
Solution 4:
replay with batch and different topic with less partition oem with batch and less partition
Mongo DB pagination issue fixed while replaying all the events?
`Removed Skip and limit based pagination. improved batch paginated query by using.
Using skip() is not recommended when we have big data in MongoDB because always requires the server to walk from the beginning of the collection, you can use _id index with limit() to do pagination, because _id field is indexed by default in MongoDB so you can use this field for a good performance. So skip: 10000 means MongoDB scans 10,000 docs and discards them — very inefficient!
✅ Efficient Alternatives
Use Range-Based Pagination (a.k.a. “The Seek Method”)
Instead of using skip, paginate using a field like _id or a timestamp.
Example:
db.collection.find({ _id: { $gt: last_seen_id } })
			 .sort({ _id: 1 })
			 .limit(10);
Store the last_seen_id from the last page.
Fast because it uses an index and avoids skipping over documents.
Use Indexed Field for Pagination
Pick a field that’s indexed and strictly increasing (like createdAt, orderNumber, etc.)
db.collection.find({ createdAt: { $gt: lastSeenTimestamp } })
             .sort({ createdAt: 1 })
             .limit(10);
Use $facet with $limit + $skip carefully,
The main strength of $facet is not performance over skip, but this:
You can bundle multiple results (pagination + total + metadata) in a single query, with full consistency, and without multiple DB hits. Let’s break down MongoDB’s
$facetstage — it’s a powerful aggregation tool that lets you run multiple pipelines in parallel on the same input data.
Without $facet, you’d need:
- One query for the data (
skip,limit). - Another query for the count (
countDocuments()).$facetgives you both in one round trip, reducing latency and ensuring data consistency between your page and its count. Keep result size within 16 MB document limit